Monday, March 23
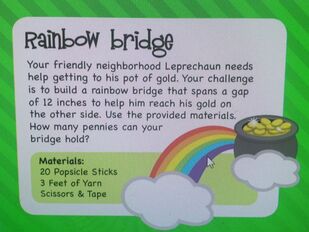
Have a fun, creative time trying to help the Leprechaun reach his pot of gold! Please color the popsicle sticks with rainbow colors! You can always add any materials you have at home to make the assignment even more challenging and fun! Reminder to sketch out your ideas first so that it is easier to create your bridge.
Monday, March 30th
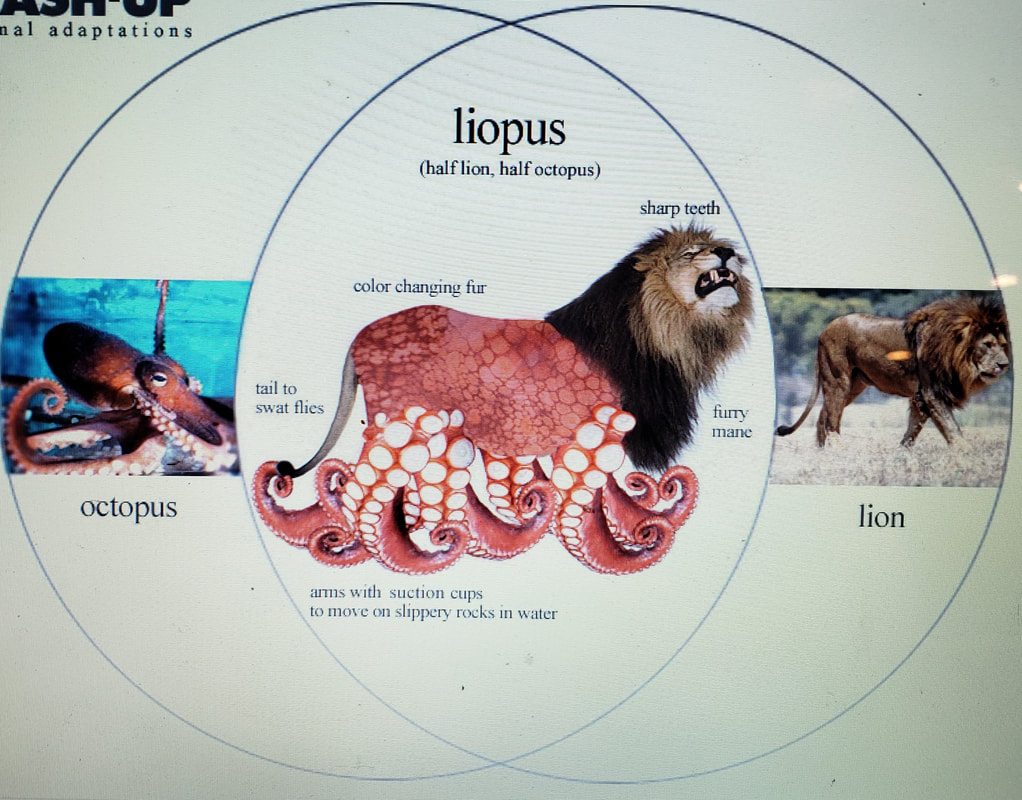
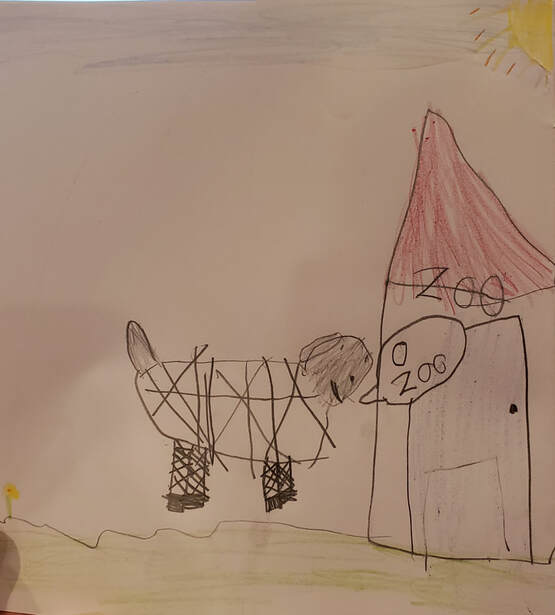
Morphed Animal Project
Hello 1st Grade!!! I am missing you all like crazy. For this weeks project, I would love to continue our unit on animal habitats and adaptations. But we are going to have some fun with it. This week you guys are going to mash two creatures together to create a new animal! After you create (draw) your creature, you need to name your new creation and describe its special characteristics. Where does the creature live? Make sure to draw its habitat. Draw what it eats? What other creatures eats it?! How is it adapted to its environment?
If you can try to download the switchzoo app(the free one) or go to switchzoo.com to get ideas. There you can try many different animals and get the right combo for you. Have some fun! Can't wait to see some of the creations. Would love to see some posted on Mrs. Hall's facebook page!
If you can try to download the switchzoo app(the free one) or go to switchzoo.com to get ideas. There you can try many different animals and get the right combo for you. Have some fun! Can't wait to see some of the creations. Would love to see some posted on Mrs. Hall's facebook page!
|

|
First Grade!! I miss you all so much!! Hope you are having a great time learning while at home! I definitely miss seeing you every week. I have read another one of my favorite books for you to watch. Hope you enjoy it too!!
Miss you,
Mrs. Erickson
Miss you,
Mrs. Erickson
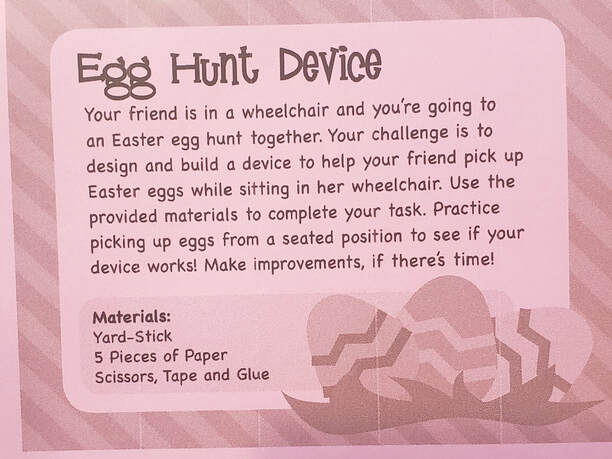
Easter Stem Challenge
Since Easter is next week I thought it would be fun to get in the Easter spirit with an Easter themed challenge. This one includes my best friend Ms. S!! Since we are not at school and I don't have the same supplies for everyone to use, you can use ANYTHING you want to make this challenge successful. The more creative and innovative the better! Have fun. Can't wait to show Ms. S what all of you inventors come up with.
|
|
Below is a video of what my kids made for this challenge. Hope you all have fun making your new invention!
Week Of April 20th
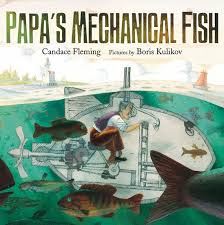
Hi there 1st grade! This week we will be reading "Papa's Mechanical Fish" by Candace Fleming. Please watch the video below of me reading this amazing story. This book will set us up for next week's activities of learning about submarines!
Week of April 27th
This week we will be learning about submarines! Please watch the two videos below! Hope you all are having a wonderful week!! I miss you all!
Week of May 4th
Please watch the three videos below. When you are done watching the videos and have time try the Butterfly Stem Challenge! Hope you all are well and have an amazing week!
Butterfly Stem Project
Below is the packet of a Butterfly Stem Challenge we are doing for STEM this week. You are to create a structure to hang a chrysalis from so that your butterfly will be protected from it's predators. You can use any items you have from your house to built and create your structure. Make sure to plan it out before you start to build. I can't wait to see all of your creations!
| butterflystemchallenge_grace.pdf |
Week of May 11th
Good Morning! Please watch the videos below! Hope you are having an amazing week!!
Bird Nest Challenge
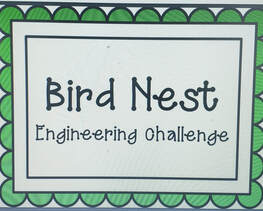
For this week we will be getting outside and collecting materials around your neighborhood and backyard. If it is "OK" with your parents. You are going to try to create a birds nest. You can use any materials that you find outside. Sticks, string, leaves or seeds. Try to come up with a creative way to hold all of these materials together the way a bird would. Below is a file with all of the directions. Have fun!
| birdnestsengineeringchallengeprojectgrace.pdf |
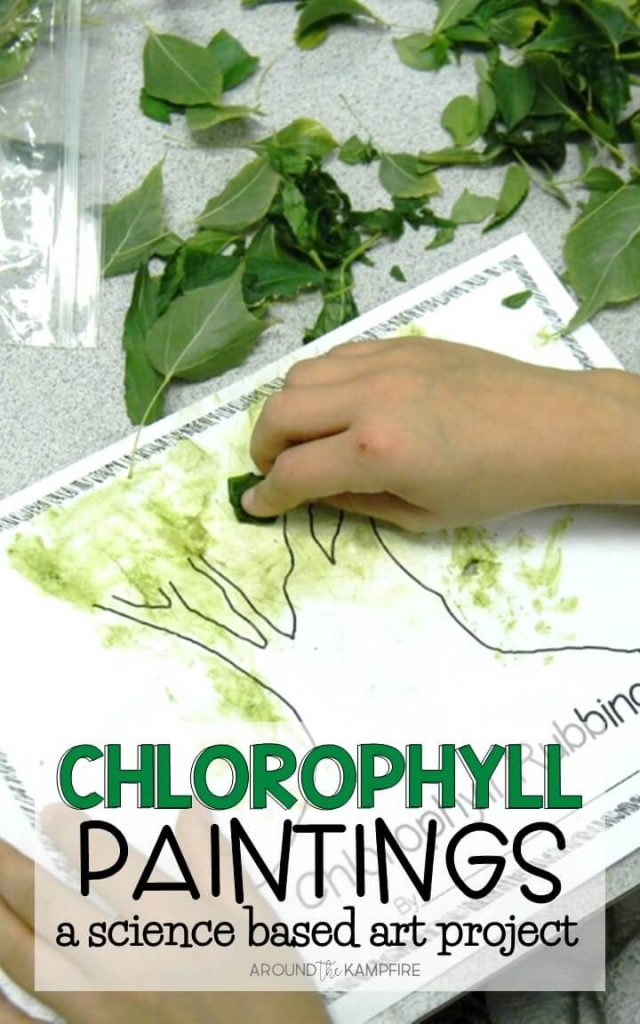
Week of May 18th
|
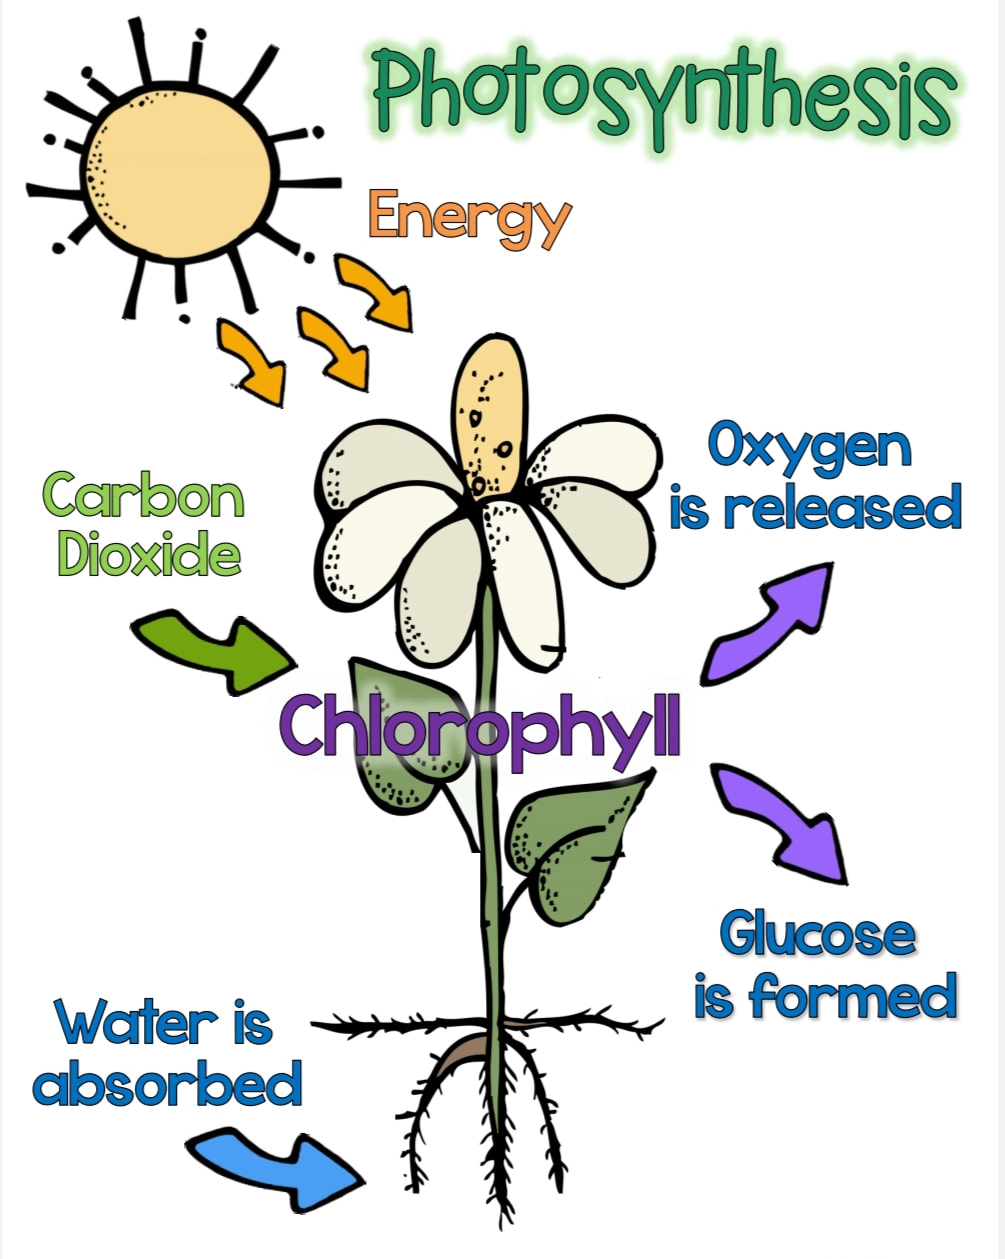
|
| tree-trunk-line-drawing-8.jpg |
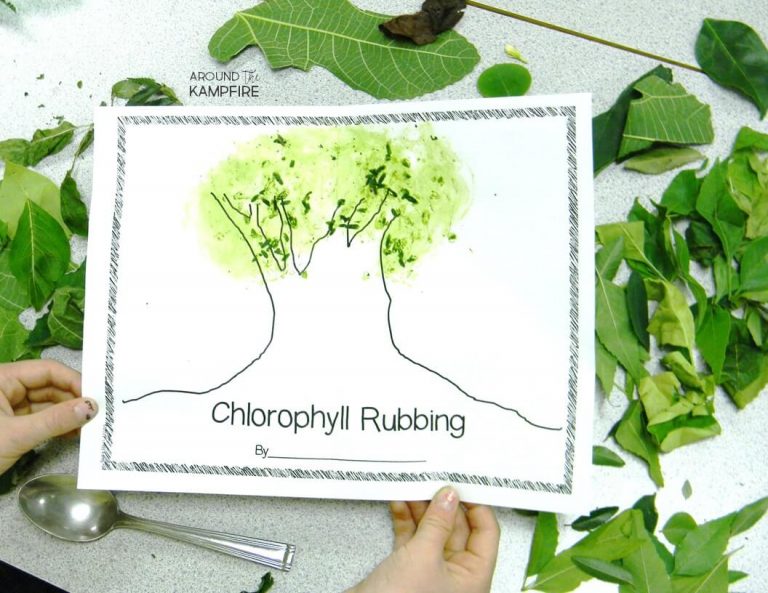
STEP 1: Gather leaves STEP 2: Smash leaves
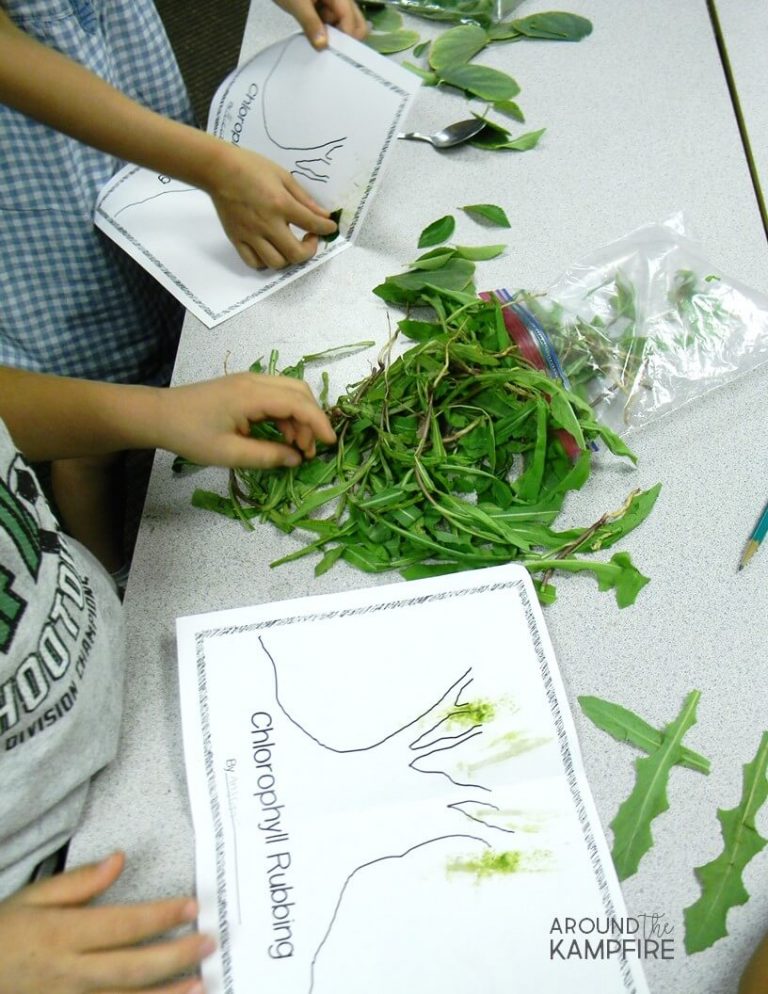
STEP 3:Use a spoon to smash if needed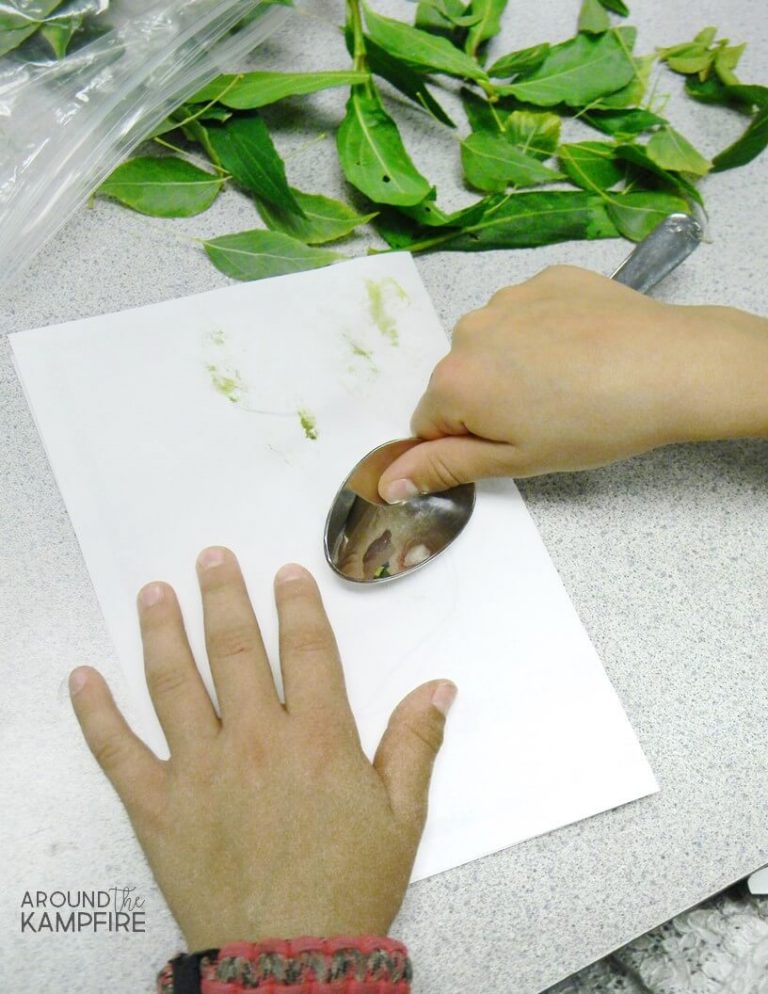
|
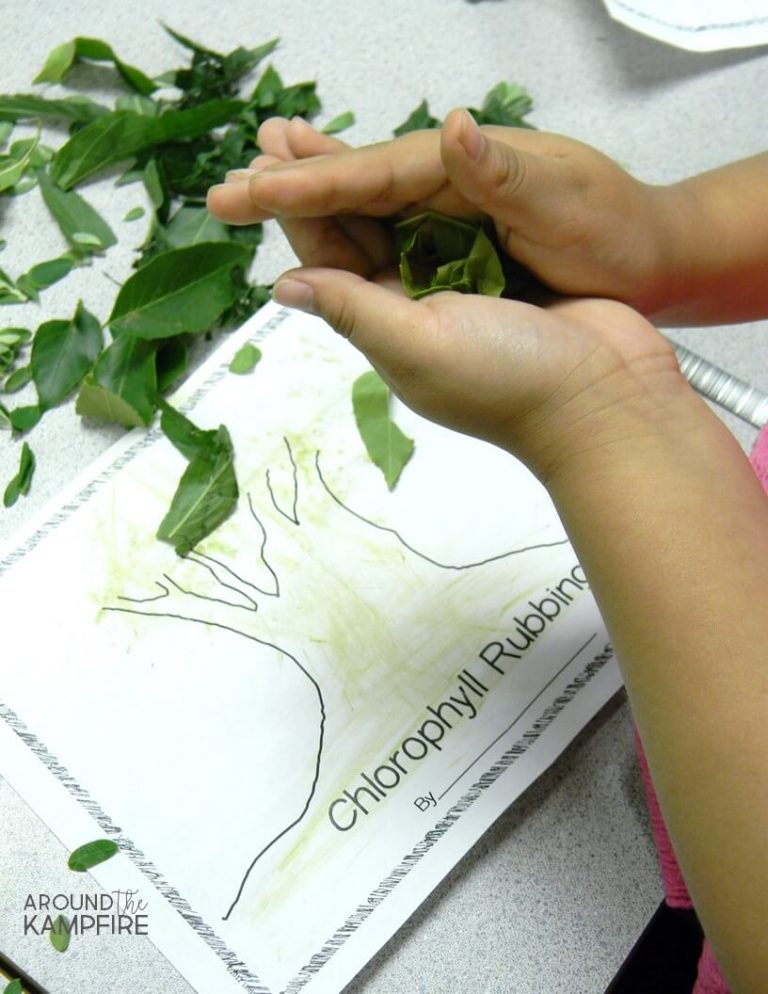
STEP 4:Use smashed leaves to color leaves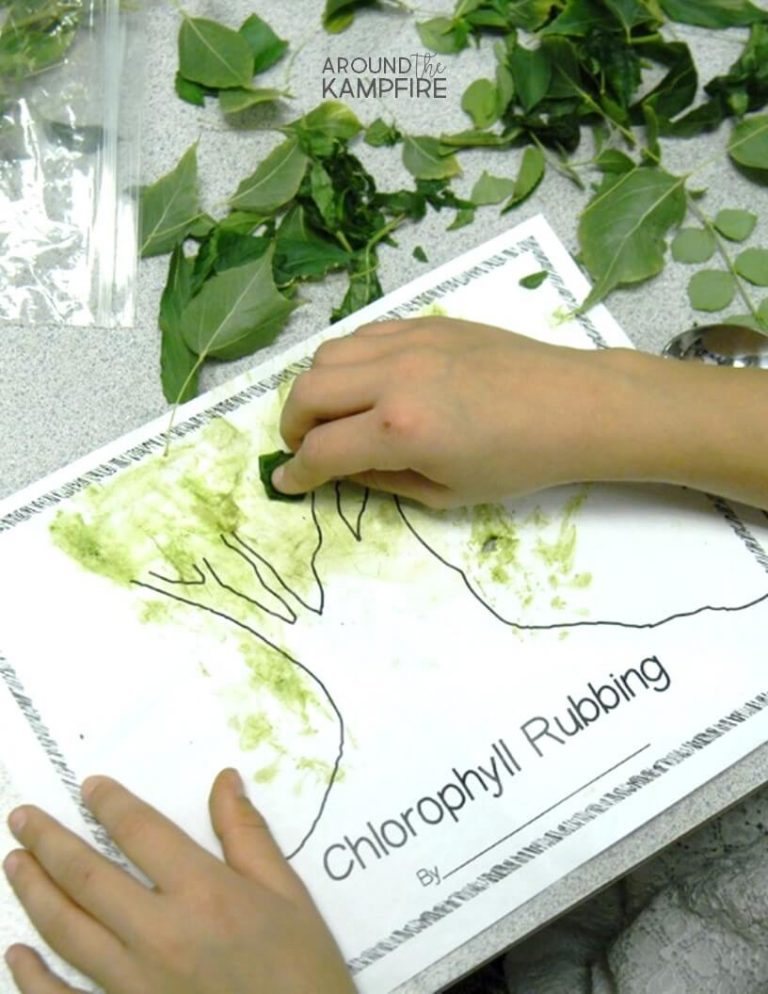
|
STEP 5: Make sure to show me your nature artwork!
Week of May 25th
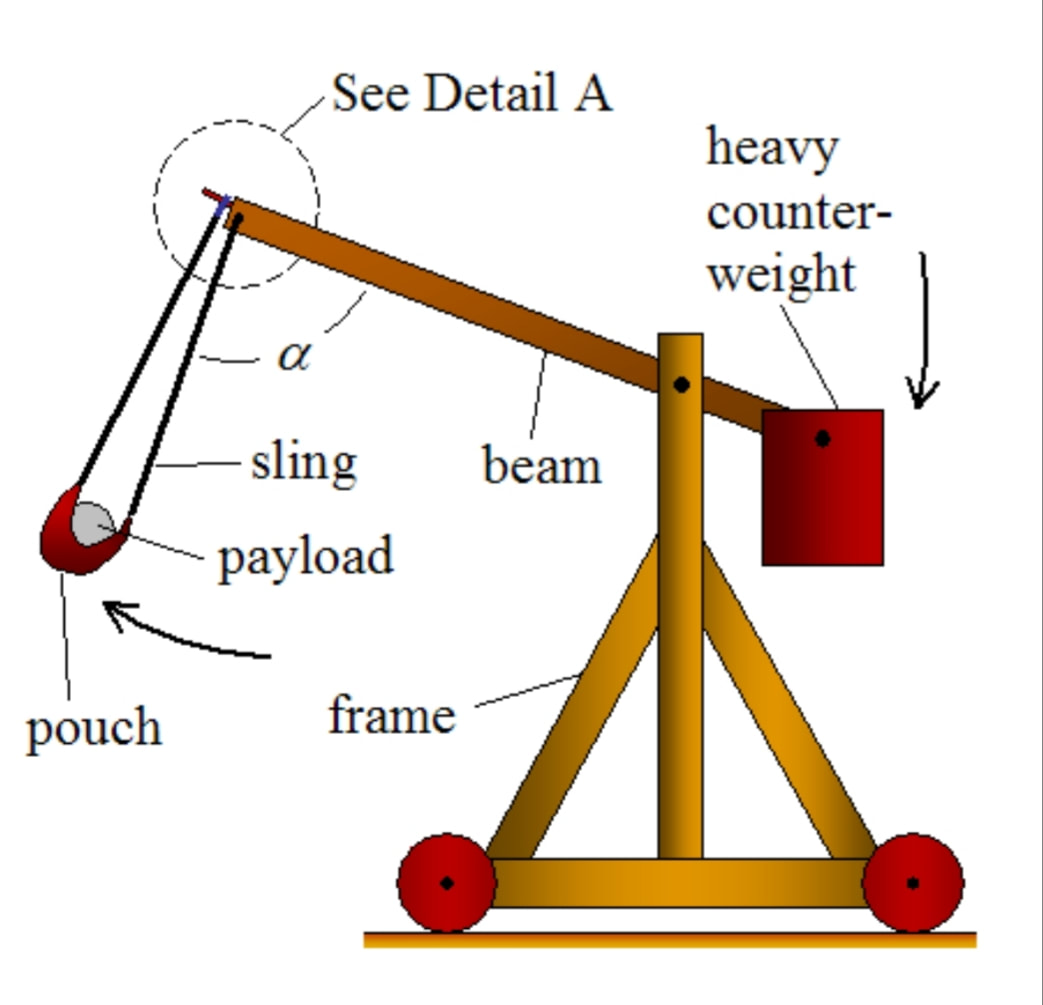
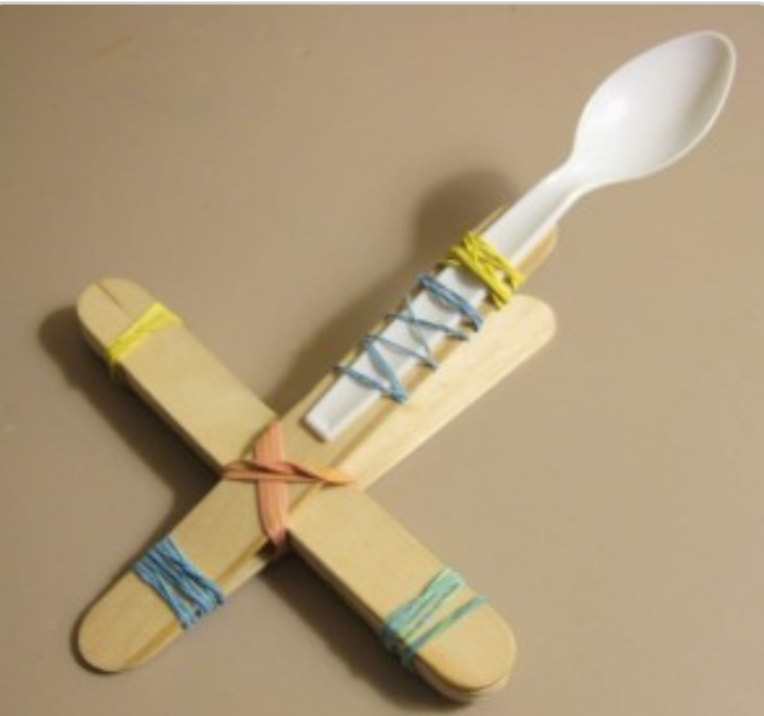
Marshmallow Catapult

|
|
STEP-BY-STEP Instructions to Build A Catapult
STEP 1: Collect Materials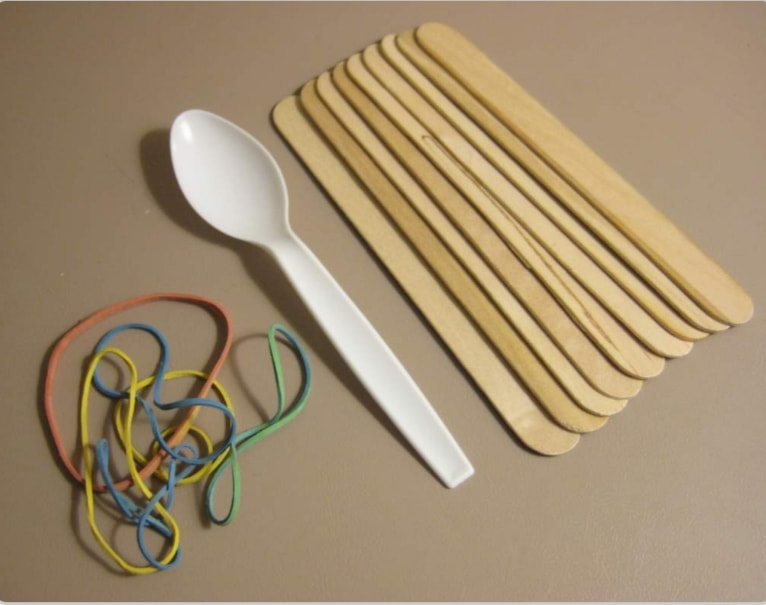
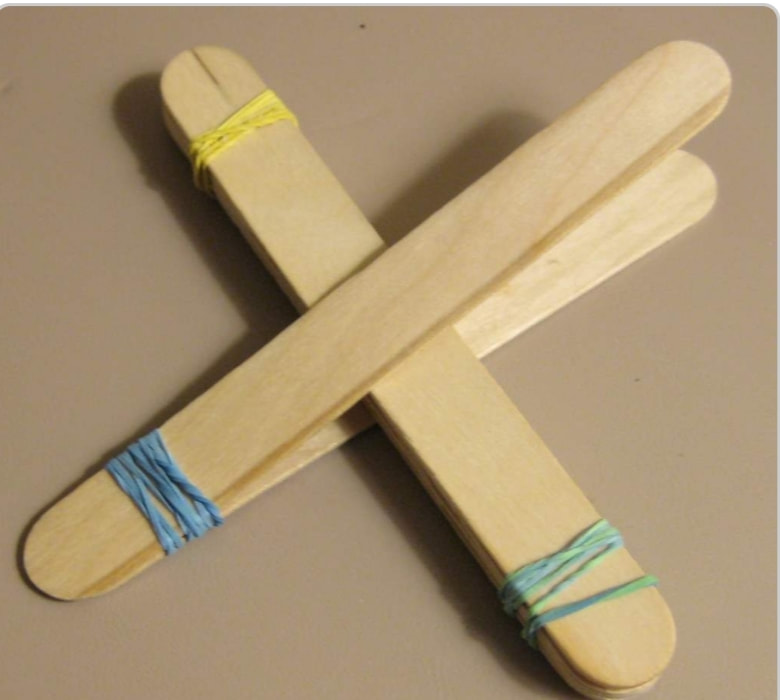
STEP 3: Take 2 craft sticks and tie a rubber band on one of the ends. Try to tie the band close to the edge of the stick.
|
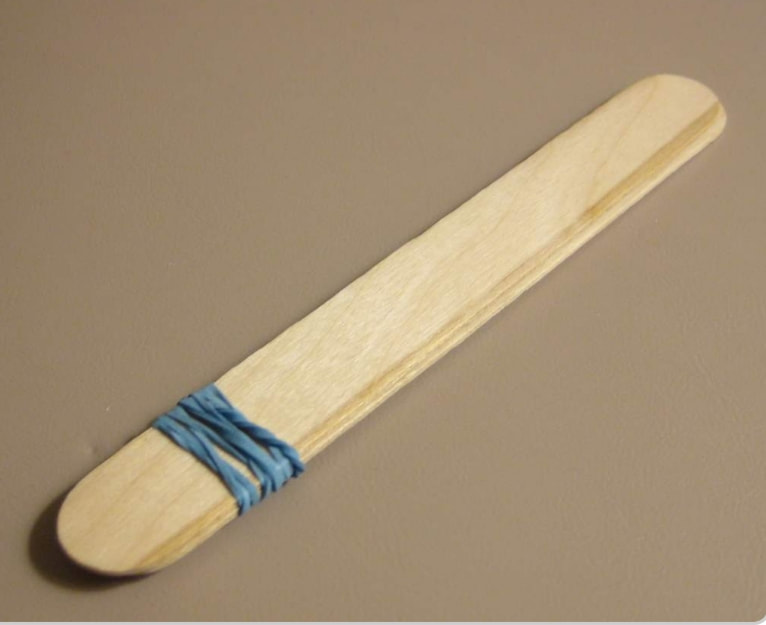
STEP 2: Take seven craft sticks and tie a rubber band tightly around one end.

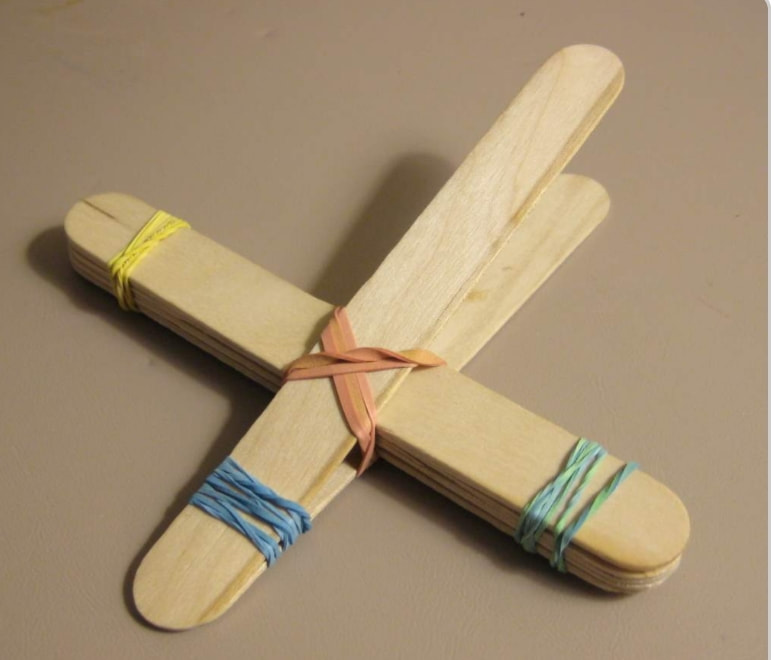
STEP 4: Insert the 7 sticks banded together through the 2 stick bundle as shown below. |
|
|
|
STEP 5: Tie the rubber band in a cross fashion joining the two pieces. The closer the 7 stick bundle gets to the edge the more leverage the catapult will have.
|
STEP 6: Use a few rubber bands and attach the plastic spoon to the end.
|
Week of June 1st
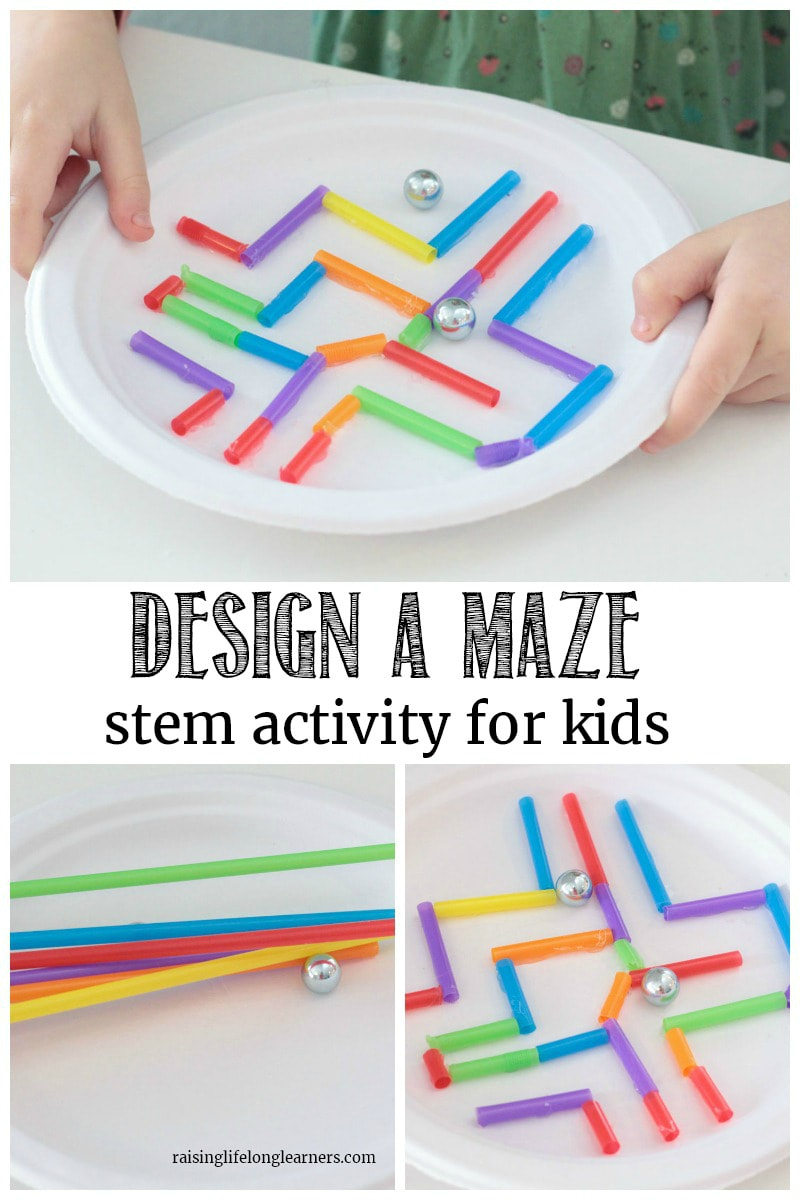
What you’ll need to have on hand:
- Paper plates
- Various household supplies (cardboard, straws, cotton balls, string, etc)
- Glue (we found tacky glue and hot glue worked best)
- Scissors
- Marbles
The goal of this project is to create a maze that fits a marble, contained inside a paper plate, that works completely, and doesn’t break when playing with it. Kids will have to use quite a few skills to get this design to work.
What designs worked best? What designs were not as good? What were the best parts and worst parts of each design? How could the kids improve on them in the future?
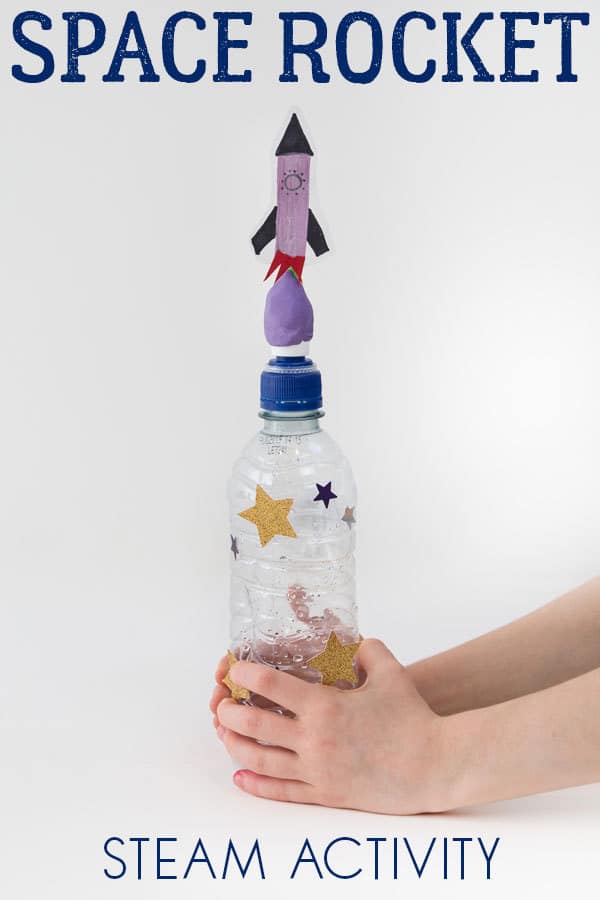
HOW DO THEY WORK?
When you squeeze the bottle air is forced out of the straw in the bottle and pushes against the rocket straw ( which is sealed at one end ). The force of air on the rocket straw makes it fly through the air.
MATERIALS NEED FOR YOUR ROCKET
INSTRUCTIONS ON MAKING YOUR ROCKET LAUNCHER
BOTTLE ROCKET
Lift up the sports cap of your bottle and push in half of your thinner straw. Seal around the straw and sports cap with blu tack or plasticine. Squeeze the bottle and make sure air is coming out of the top of the straw ONLY, not from the sides.
Straw Rocket
Draw and cut out a cardboard or paper rocket. Seal one end of your wider straw using sellotape. This straw must fit over the top of your thinner straw. Blow down the straw and make sure no air can escape from the top. Attach your card or paper rocket onto one side of the straw with double sided tape. Place the rocket onto your bottle launcher and squeeze the bottle hard. Your straw rocket should shoot into the air. Have fun!
When you squeeze the bottle air is forced out of the straw in the bottle and pushes against the rocket straw ( which is sealed at one end ). The force of air on the rocket straw makes it fly through the air.
MATERIALS NEED FOR YOUR ROCKET
- Empty Squeezy water bottles with a sports cap
- Cardboard
- Straws – one wider than another
- Scissors
- Glue/sellotape
- Blu tack or Plasticine
INSTRUCTIONS ON MAKING YOUR ROCKET LAUNCHER
BOTTLE ROCKET
Lift up the sports cap of your bottle and push in half of your thinner straw. Seal around the straw and sports cap with blu tack or plasticine. Squeeze the bottle and make sure air is coming out of the top of the straw ONLY, not from the sides.
Straw Rocket
Draw and cut out a cardboard or paper rocket. Seal one end of your wider straw using sellotape. This straw must fit over the top of your thinner straw. Blow down the straw and make sure no air can escape from the top. Attach your card or paper rocket onto one side of the straw with double sided tape. Place the rocket onto your bottle launcher and squeeze the bottle hard. Your straw rocket should shoot into the air. Have fun!
